- Right-click on “Windows PowerShell” or “PowerShell (Admin)” and select “Run as administrator” to open PowerShell with administrative privileges.
- Use the New-SmbShare command to create a new SMB share. Here’s an example:
New-SmbShare -Name "ShareName" -Path "C:\Path\To\Share" -Description "Description of the share" -FullAccess "Everyone"
Replace "ShareName" with the desired name of your share, "C:\Path\To\Share" with the path of the folder you want to share, and "Description of the share" with a brief description (optional).
The -FullAccess "Everyone" parameter allows full access to everyone. You can adjust access permissions as needed by specifying different users or groups.
Set Additional Parameters (Optional): There are several other parameters you can use to configure the share, such as -CachingMode, -EncryptData, -FolderEnumerationMode, -EncryptData, -ChangeAccess, and more. You can explore these options in the PowerShell documentation (Get-Help New-SmbShare -Full).
- Verify the Share: After creating the share, you can verify its creation by checking the SMB shares on your system. You can use the
Get-SmbSharecmdlet to view all SMB shares:
Get-SmbShareThis command will display a list of all existing SMB shares on your system.
Remember to adjust the permissions and settings according to your specific requirements and security considerations when setting up a share.
Please note that creating a share may require administrative privileges and may impact system security, so ensure that you have the necessary permissions and consider the security implications before sharing folders or files.
Connect your share to proxmox.
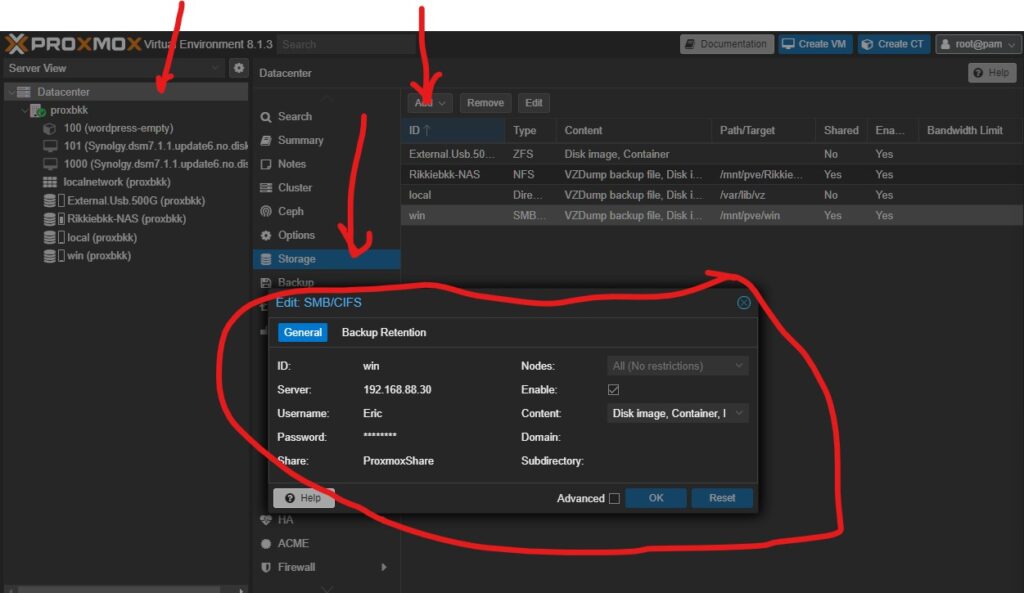
- Open Proxmox and select “Datacenter” on the left pane.
- In the right pane go to Storage – Add and select “SMB/CIFS” from the dropdown list.
ID: Name you want to give your disk in proxmox
Server: IP address of your pc witch have the share
Username: your login on that machine
password: your password for that machine
Share: Select your SMB share out of the list
Content: Select everything
Dont forget Backups come in to the DUMP directory of your share

Thats it if you have trouble with making a share google is your best friend.
As usual if you like this just buy me a coffee to keep me going.

if you have any questions just send email to RikkieBkk
 2553
2553


